

How To Make Background Transparent In Powerpoint
Excel for Microsoft 365 Outlook for Microsoft 365 PowerPoint for Microsoft 365 Project Online Desktop Client Excel for Microsoft 365 for Mac PowerPoint for Microsoft 365 for Mac Excel for the web PowerPoint for the spider web Excel 2021 Outlook 2021 PowerPoint 2021 Project Professional 2021 Projection Standard 2021 Excel 2021 for Mac PowerPoint 2021 for Mac Excel 2019 Outlook 2019 PowerPoint 2019 Projection Professional person 2019 Project Standard 2019 Excel 2019 for Mac PowerPoint 2019 for Mac Excel 2016 Outlook 2016 PowerPoint 2016 Project Professional person 2016 Projection Standard 2016 Excel 2016 for Mac PowerPoint 2016 for Mac Excel 2013 Outlook 2013 PowerPoint 2013 Project Professional person 2013 Project Standard 2013 Excel 2010 Outlook 2010 PowerPoint 2010 Excel 2007 Outlook 2007 PowerPoint 2007 Excel for Mac 2011 PowerPoint for Mac 2011 More than...Less
Bones steps to motion picture transparency
In short, the steps for making a picture transparent are:
Describe a shape showtime, fill it with a moving-picture show, and then adjust the picture'south transparency.
This process is demonstrated in the video. For more details on this procedure and other methods, click a procedure heading below to expand it and encounter the details.

One-minute sit-in
Detailed steps for transparency
-
Select Insert > Shapes. Choose a shape from the gallery that opens.
-
Draw the shape in your document, making information technology the same proportions as the picture you're about to add together to information technology.
-
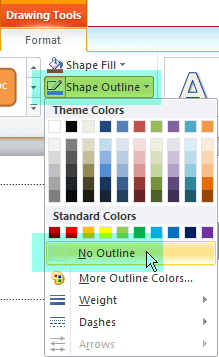
Select the shape. Click Format > Shape Outline > No Outline.
-
Right-click the shape again, and and then click Format Shape.
-
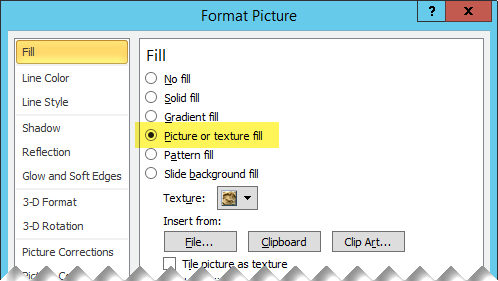
In the Format Shape pane, click the Fill icon
 , then click Pic or texture fill.
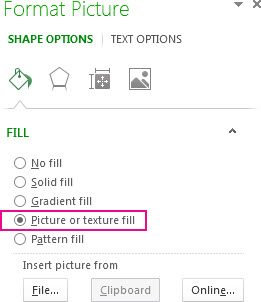
-
Click the File button. In the Insert Pic dialog box, locate the picture file that you want to insert. Select the picture so select the Insert button.
-
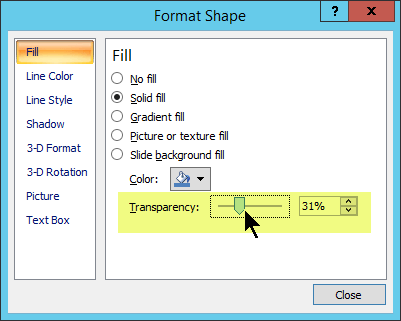
Move the Transparency slider in the Format Shape pane to suit the picture.
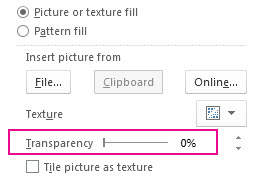
Or you may enter a number in the box next to the slider: 0 is fully opaque, the default setting; and 100% is fully transparent.
If you modify the original size ratio of your shape by dragging it, the picture you insert into the shape may be skewed. Also, some pictures may non fit perfectly into certain shapes. Y'all tin can brand adjustments to the appearance of your motion-picture show by resizing your shape or by using the Offset settings beneath the transparency slider.
Y'all can make 1 colour in a picture transparent by using the born transparency characteristic.
Different making an entire picture transparent, making only 1 color transparent is possible only in an object that'south inserted as a movie, not inside a shape. If your flick is inserted in a shape as fill, as described above, the Fix Transparent Color option is not bachelor.
Important:Areas that seem to be a single color (for example, green leaves) might actually be made up of a range of subtle color variations, and you might not get the effect you lot desire. Setting a transparent color works best with simple, solid-color pictures, such equally clip art.
-
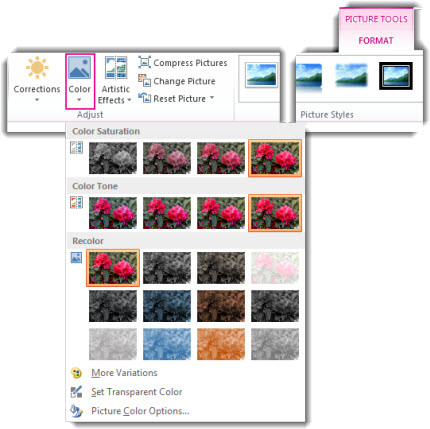
Double-click the film, and when Movie Tools appears, click Picture Tools Format > Color.
-
Click Set Transparent Color, and when the pointer changes, click the color you want to make transparent.

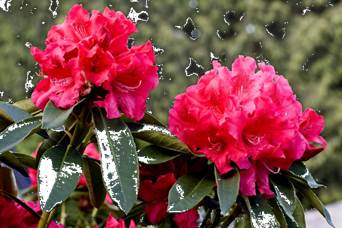
In the flick below, the leaves are composed of several colors of green, then only part of the leaves are made transparent, which makes it difficult to run into the transparent effect. Repeating the process with a dissimilar colour will remove the transparency from the first color. To undo color changes, click Reset Picture in the Adjust group.
Note: When you lot print pictures with transparent areas, the transparent areas are the same color as the paper. On your screen or a website, the transparent areas are the same colour as the background.
-
Select Insert > Shapes.
-
Select a shape from the drib-down gallery and and then depict it the size that you want.
-
Correct-click the shape and choose Format Shape.
The Format Shape console opens.
-
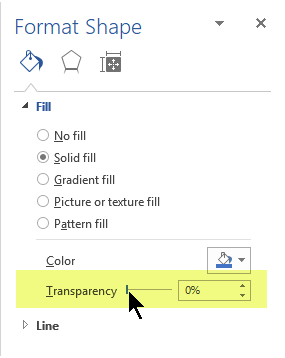
In the panel, open the Fill up section.
-
Select the Transparency slider and elevate rightward to set the caste of transparency you desire.
If you have an image editing app, y'all can utilise information technology to brand your movie transparent. Then save the picture in a format that preserves transparency information (such as a Portable Network Graphics (.png) file), and insert the file into your Office document.
Basic steps to moving picture transparency
In brusque, the process for making a picture transparent is:
Describe a shape commencement, fill it with a picture, and then adjust the picture's transparency.
This process is demonstrated in the video. For more than details on this process and other methods, click a procedure heading below to expand it and see the details.
I-minute demonstration
Detailed steps for transparency
Describe a shape first, fill it with a flick, and then adjust the picture'southward transparency:
-
Select Insert > Shapes. Choose a shape from the gallery that opens.
-
Draw the shape in your document, making information technology the aforementioned proportions as the picture yous're about to add together to it.
-
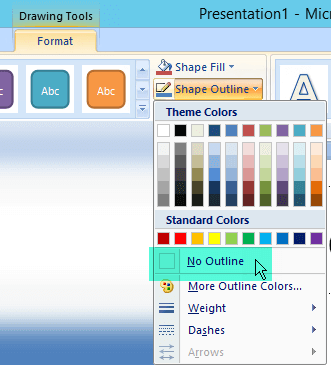
Select the shape. Click Format > Shape Outline > No Outline.
-
Correct-click the shape over again and select Format Shape.
-
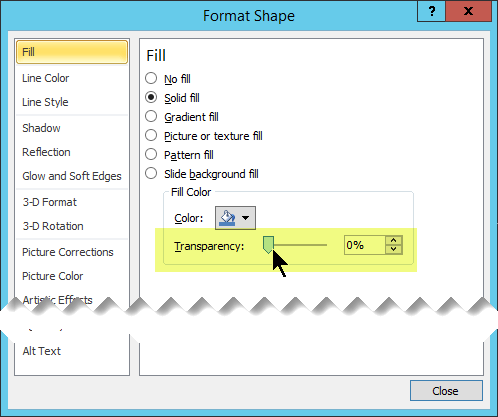
In the Format Shape dialog box, under Fill up, select Picture or texture fill, and so select File.

-
In the Insert Flick dialog box, find your picture, select it, and then select Insert.
The picture is added to slide, inside the shape. You may need to move the Format Picture dialog box to see information technology. Keep the dialog box open to adjust the transparency.
-
With the picture now showing within the shape, in the Format Motion picture dialog box, motion the Transparency slider rightward (or enter a number in the box next to the slider) to arrange the film equally you encounter fit.
You lot can vary the percentage of transparency from 0 (fully opaque, the default setting) to 100% (fully transparent).
-
Select Close to dismiss the dialog box.


Tip:If you change the original size ratio of your shape by dragging it, the picture show you insert into the shape may be skewed. Too, some pictures may non fit perfectly into certain shapes. You can make adjustments to the appearance of your picture by resizing your shape or past using the Offset settings above the transparency slider.
You lot tin can make one color in a picture transparent past using the congenital-in transparency feature.
Dissimilar making an entire picture transparent, making only 1 color transparent is possible but in an object that's inserted equally a picture, not inside a shape. If your movie is inserted in a shape as fill, equally described above, the Set Transparent Color selection is not bachelor.
Important:Areas that seem to be a unmarried color (for example, green leaves) might actually be made up of a range of subtle colour variations, and you lot might non get the consequence you want. Setting a transparent color works best with simple, solid-colour pictures, such every bit clip art.
-
Double-click the picture, and when Picture Tools appears, click Moving picture Tools Format > Color.
-
Click Set Transparent Color, and when the arrow changes, click the color you want to make transparent.
In the movie beneath, the leaves are equanimous of several colors of greenish, so but function of the leaves are made transparent, which makes information technology difficult to meet the transparent effect. Repeating the procedure with a different color will remove the transparency from the beginning color. To disengage color changes, click Reset Motion picture in the Suit group.
Note: When you print pictures with transparent areas, the transparent areas are the same colour equally the newspaper. On your screen or a website, the transparent areas are the same color as the background.
-
Select Insert > Shapes.
-
Select a shape from the drop-down gallery and then draw it the size that you want.
-
Right-click the shape and choose Format Shape.
The Format Shape dialog box opens.
-
In the dialog box, in the Fill section, select the Transparency slider and drag rightward to set the caste of transparency you want.
If yous have an image editing app, you can use it to make your picture transparent. And so save the flick in a format that preserves transparency information (such equally a Portable Network Graphics (.png) file), and insert the file into your Office document.
Basic steps to picture transparency
In short, the steps for making a picture transparent are:
-
Draw a shape first
-
Fill it with a motion picture
-
Adjust the picture's transparency
Detailed steps for transparency
Insert a picture, inside a shape, at the precise size you desire, and so adjust its transparency:
-
Select Insert > Shapes. Choose a shape from the gallery that opens.
-
Draw the shape in your document, making information technology the same proportions equally the picture you lot're about to add to it.
-
Select the shape. Click Format > Shape Outline > No Outline.
-
Right-click the shape and select Format Shape.
-
In the The Format Shape dialog box, under Fill, select Moving-picture show or texture fill, and then select File.
-
In the Insert Picture dialog box, locate the movie that you lot desire, select it, and then select Insert.
The movie is added to slide, inside the shape. You may need to move the Format Picture dialog box to run into information technology. Proceed the dialog box open to adjust the transparency.
-
With the picture now showing within the shape, in the Format Motion-picture show dialog box, move the Transparency slider rightward (or enter a number in the box next to the slider) to adapt the picture equally y'all see fit.
You can vary the percentage of transparency from 0 (fully opaque, the default setting) to 100% (fully transparent).
-
Select Close to dismiss the dialog box.


Yous can brand one color in a motion-picture show transparent by using the congenital-in transparency feature.
Important:Areas that seem to exist a single color (for example, green leaves) might actually exist made upwardly of a range of subtle color variations, and yous might non get the issue you desire. Setting a transparent colour works best with unproblematic, solid-color pictures, such equally clip art.
-
Click the picture that you want to create transparent areas in.
-
Under Moving picture Tools, on the Format tab, in the Accommodate group, click Recolor.

-
Click Set Transparent Colour, then click the color in the picture or image that you want to make transparent.
Notes:
-
The Set Transparent Colour option is available for bitmap pictures that are not already transparent, and some clip fine art.
-
You cannot create a transparent area in animated GIF pictures. You can, still, make transparency changes in an animated-GIF editing program, and then re-insert the file into your 2007 Microsoft Office organisation certificate.
-
You can brand more than i color transparent in a motion picture in another prototype editing program, relieve the picture in a format that preserves transparency data (such as a Portable Network Graphics (.png) file), and then insert the file into your 2007 Office release document.
-
-
Select Insert > Shapes.
-
Select a shape from the drib-downward gallery and then describe it the size that you desire.
-
Correct-click the shape and cull Format Shape.
The Format Shape dialog box opens.
-
In the dialog box, in the Fill section, select the Transparency slider and drag rightward to set the degree of transparency you want.
If you have an prototype editing app, you can use it to brand your moving picture transparent. Then save the moving-picture show in a format that preserves transparency information (such as a Portable Network Graphics (.png) file), and insert the file into your Office document.
Change the transparency of a motion-picture show or fill colour
-
Select the moving-picture show or object for which you desire to change the transparency.
-
Select the Motion picture Format or Shape Format tab, and then select Transparency
.
A gallery of preset transparency options for the picture appears.
-
Select one of the preset options, or select Flick Transparency Options at the lesser for more detailed choices.
The Format Motion picture pane opens on the right side.
-
Under Picture Transparency, drag the transparency slider rightward to set the exact percentage of transparency you lot desire, or ready a per centum value in the box.
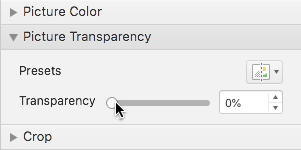
Y'all tin vary the percentage of transparency from 0 (fully opaque, the default setting) to 100% (fully transparent).

Brand role of a picture transparent
You can make one color in a motion-picture show transparent to hide office of the picture or create a layered consequence. Transparent areas in pictures are the same color as the paper on which they are printed. In an electronic brandish, such as a web page, transparent areas are the aforementioned color as the background.
-
Select the motion picture for which you want to change the transparency of a color.
-
On the Moving-picture show Format tab, select Color, then select Ready Transparent Color.
-
Click the color in the picture or image that you want to make transparent.
Notation:You can't brand more than than one color in a pic transparent. Areas that appear to be a unmarried color (for example, blueish heaven) might actually be fabricated upwardly of a range of subtle color variations. Therefore, the color that you select might appear in only a modest surface area, and it might be difficult to see the transparent effect in certain pictures.
Change the transparency of a moving-picture show or fill color
-
Select the motion picture or object for which you want to change the transparency.
-
Select the Format Picture or Format tab.
-
Drag the Transparency slider (circled in dark-green int he pic below) rightward to fix the exact per centum of transparency yous want.

Make part of a movie transparent
You lot tin can make one color in a picture transparent to hide part of the picture or create a layered effect. Transparent areas in pictures are the same color as the newspaper on which they are printed. In an electronic brandish, such as a web page, transparent areas are the same color equally the background.
-
Select the picture for which you want to alter the transparency of a color.
-
On the Format Picture tab, click Recolor, and then select Set Transparent Colour.
-
Click the colour in the picture or image that you desire to make transparent.
Annotation:You can't make more than one colour in a picture transparent. Areas that appear to be a single colour (for case, blue heaven) might actually be made up of a range of subtle color variations. Therefore, the color that yous select might appear in but a modest expanse, and it might exist difficult to run into the transparent result in certain pictures.
Yous tin't brand a motion-picture show transparent in Part for the web. You have to utilize a desktop version of Function (on either Windows or macOS) instead.
Run into Likewise
Add a groundwork or watermark to slides
Remove the groundwork of a picture
Modify the brightness, contrast, or sharpness of a movie
Change the color of a flick
Use an artistic effect to a picture

How To Make Background Transparent In Powerpoint,
Source: https://support.microsoft.com/en-us/office/make-a-picture-transparent-ce96ac80-5afc-436c-ae3f-0c78009bf704
Posted by: mcsherrydits1975.blogspot.com
0 Response to "How To Make Background Transparent In Powerpoint"
Post a Comment